Thursday, January 13, 2011

Lemon Ginger Blueberry Bread Recipe

My favorite, go-to quick bread recipe is my yogurt bread. I usually make just plain lemon bread but you can change up the flavor by mixing in different fruit, nuts or chocolate chips. Also, you can substitute flavored yogurts or even sour cream for the plain yogurt!

3 c. all-purpose flour
1 tsp. salt
zest of 1 lemon
1 tsp. baking soda
1/2 tsp. baking powder
2 c. fresh or frozen blueberries
1-2 tbsp. finely chopped candied ginger (depending on how much you like ginger)
3 eggs
1 c. sugar
2 c. plain yogurt
2 tbsp. lemon juice (or other acidic juice like OJ)
2 tsp. vanilla extract

Pre-heat oven to 325 degrees F. Sift together the flour, salt, baking soda and powder in a bowl; toss in the ginger and blueberries. Beat the eggs in a seperate, larger bowl. Add the sugar and whisk together well. Add the yogurt lemon juice and vanilla into the egg mixture. Pour the flour mixture into the egg mixture and stir together until well combined.

Pour into two greased loaf pans and bake for 50-60 minutes or until golden and springs back to the touch. Turn out on racks to cool.


Wednesday, December 1, 2010

Etsy Christmas Kids' Treasury

I know it's been SOOOOO long since I posted a blog but here is just a shorty.

I started creating treasuries on Etsy recently and I did this one since I see very few that are geared towards kids. What better time to have a children's treasury than Christmas time!?

Take a second to check it out here: Kids' Christmas Treasury

Think outside the "Big Box" and shop handmade!

Sunday, March 14, 2010

Easter Basket (Boxet) Instructions

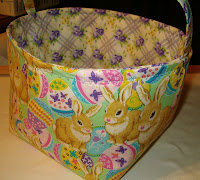
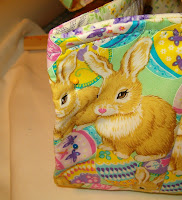
Since I've had several people ask about instructions for making my Easter boxets I figured the best way to do this is to blog it. Anyone that has questions, please feel free to ask if something isn't clear. My apologies for the not-so-great pics but it was night time and my camera doesn't like the dark...and I had trouble getting them in exact order but it's close!

Here we go!

Materials needed:
cardboard or paper for template
1/2 yard of 44" wide fabric for lining
1/2 yard of 44" wide fabric for outer shell fabric
3/4 yard of heavy interfacing (you can use a double layer of thinner interfacing too)
(there will be enough fabric left over for your handles)
matching thread
sewing machine, scissors, iron and ironing board, etc.
Seam allowances are 3/8".

Step 1.
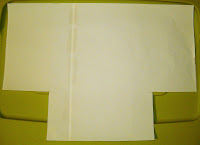
You will need to cut a template out of whatever suits you (cardboard, paper, etc.). This template measures 17-inches wide by 12-inches high so cut a rectangle using those measurements. Next, cut out a 4-inch square on each side of the bottom. This will later create a gusset and make the bottom square. For the handles you will need to cut a piece 20-inches long by 3.5-inches wide.

Step 2.
Using this template, cut out 2 each of the outer shell fabric, lining fabric and interfacing.
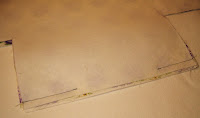
Pin the outer shell pieces right sides together and sew along each side and bottom...DO NOT SEW INSIDE CORNERS YET!


Lay down one piece of interfacing, then a lining piece with right side up followed by the next lining piece with WRONG SIDE up and finally the second piece of interfacing...pin all layers together. Sew down both sides but when you get to the bottom you will need to leave an opening for turning right-side-out later.


Step 3.
You will need your iron for this step for best results.
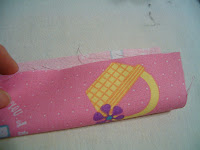
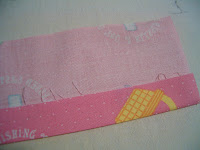
Using the handle template, cut out 2 each of either lining or shell fabric, whichever you choose. Fold first piece in half lenghtwise (wrong sides together) and press.
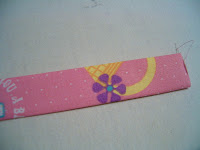
Unfold and bring both edges to center crease and press again. Fold in half lengthwise and press. Stitch down the lenght of both sides. (I used photos of a different handle that doesn't match the basket in the other photos.)


Step 4.
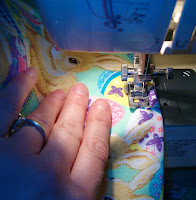
Line each end of handle up with seams and pin the handle in place and stitch (1/8" from edge) to shell on right side of fabric, reversing and going over a second time (see photo).

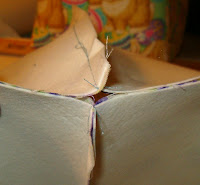
Step 5. On both the lining and the shell, fold corners in together, matching seams (see photos). This part is sort of hard to explain but hopefully the photos help. Press and pin together, stitch. Trim excess.


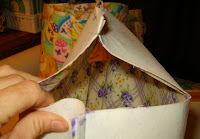
Step 6. Turn shell out so that right side is facing out. Turn lining so that interfacing is on the outside. Insert shell into lining, making sure to tuck handle in between shell and lining. Stitch all the way around the top. After stitching, trim away excess interfacing to reduce bulk.


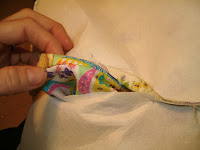
Step 7. Pull the shell through the hole in the bottom of lining, turning out to right sides. This part will take a litte patience but it will turn right side out. Stitch the hole in the lining closed.


Step 8.
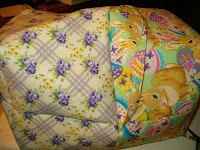
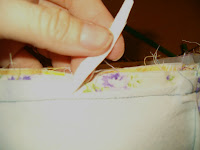
Press each of the four sides and around the top seam before stitching around the top of basket.


Step 9.

Measure 4-inches from the side seam to the corner and fold. Press and pin, sew from bottom to top (1/4-inch from edge). This will create a box corner. Repeat on remaining corners.

Tuesday, February 23, 2010

Apple Fritter Recipe


So I over did it on my produce shopping...I had about a dozen apples and needed to use some of them up. I decided to make some apple fritters because I remember my mom making those for us when we were kids. The recipe I found is different than what she made but they are still tasty!

I changed the recipe up a little to make it my own and it turned out so well I wanted to put it here on my blog. These are perfect in the morning with tea or as an afternoon nibble. A big plus is that they are easy to make!

APPLE FRITTERS

Dry ingredients
1 1/2 c. self-rising flour*
1 tbsp. sugar
1/4-1/2 tsp. ground nutmeg (optional)

Wet ingredients
2 eggs, beaten
2/3 c. milk
1 tbsp. oil
1 tbsp. lemon juice
1/2 tsp. vanilla extract
1/2 tsp. almond extract (optional)
3 c. peeled and chopped apples (about 3 medium apples)

In a small bowl combine the dry ingredients and set aside. Whisk together the wet ingredients in a medium bowl; tossing in the apples at the end. Gradually mix the dry ingredients into the wet until combined.

Heat 1-inch of canola or other cooking oil in a cast iron skillet. Bring the temberature up to 350 degrees, check using an oil/candy thermometer. You can also use an electric deep fryer and cook according to manufacturers instructions.

Carefully drop batter by spoonfuls into hot oil. Fry on first side about 1-2 minutes before turning and frying about another minute. You want a nice, deep golden brown. Remove to a wire rack with a baking sheet placed under it. Sprinkle generously with powdered sugar. ENJOY!

Makes 2-3 dozen, depending on size.

*If you don't have self-rising flour use 1 1/2 cups all-purpose flour, 2 tsp. baking powder, and 1/2 tsp. salt.

Friday, February 12, 2010

Easter Boxets (Baskets)


Okay, I just finished my latest project...Easter Boxets (baskets). They are a little bit of a change to the traditional looking Easter basket. I like them because they are collapsable and easy to store. The problem I always have with the baskets my kids get is they are clumsy and hard to store away easily.

I just listed three of them on Etsy today so please take a look!

Kiddie Shorts


I whipped up these shorts a couple weeks ago for my kids...I know summer seems a long way off to some of you. Here in the desert summer comes fast and brutally though so I'm getting a jump on it.

I had some remnant material that my daughter fell in love with (the dollies) and there was just enough for some shorts. The fabric for my son's shorts I bought before Christmas with the intention of a button up shirt but that never happened. Instead I've used it for shorts and I'm working on some Easter baskets too. The Easter baskets I will be listing on my Etsy store if anyone is interested. I like to call them "Boxets" because the look boxy but they are adorable!

Anyway, back to the shorts...they are super simple and quick to make. I just used a pattern that I had for elastic waisted pants and shortened them. And since both kids have about the same waist size it was even easier. All you need is fabric (I think I used about 1/2 - 2/3 yd for each pair) and about 18" of 3/4" wide elastic (for a size 3-5 child). It took about 20 minutes or so to make one pair. I would like to post the pattern but not sure how to go about that. I will have to look into it as I would love to share it with you all!

Well, I'm off for now...sew much to do and so little time!

Friday, January 29, 2010

Etsy Valentine Treasury....I'm in it!

I received a message from a fellow Etsy seller today informing me that I had been included in their treasury! I'm so excited about it because it's not everyday that someone chooses one of your items to go in a treasury.

Now we can only hope that Etsy will put it on the front page and we will all get lots of exposure for our stores! Follow the link below to check out this awesome treasury (mine is the HEART BLOCKS fabric gift bags).

TwentySix7's Etsy Treasury - Valentine..... Unique! The seller that created this treasury is TwentySix7 and here is a link to her lovely shop TwentySix7

How to make hot chocolate

Powered By Blogger